ResultsMail has been completely re-designed and re-engineered from the ground up. The layout, the colors, the look, the feel, everything has been updated. Our goal with this release is to make everything easier to use and to better fit your needs.
What’s New?

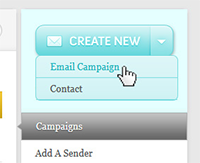
A Big New Button
We’ve added a button that says Create New. It’s a big blue button that makes it easy to do either of your most common tasks in ResultsMail: Create a New Campaign or Add New Contacts.
Contacts are now Lists
 We’ve re-named the Contacts section as “Lists”. When you click on Lists you will now see your groups of contacts with the number of Subscribers. Move your mouse over a List name and you will see icons to the right to view the list, re-name the list or delete the list.
  There are also a couple of new permanent lists you will find. The General List is where your Ungrouped contacts used to be. This is where all of your contacts that you have not placed in another List will be. The Do Not Email list is where we place all of the Unsubscribed contacts. The Do Not Email list serves as a
  suppression list to make sure that addresses that have requested to be removed from your list or that have had a hard bounce will never be sent an email from you. Also, moving Unsubscribed addresses into their own list takes them out of your other lists so that you will have a clear picture of how many current subscribers you have in each list.
New Ways to Add Contacts
 You can now Add Contacts by either using the big Create New button or by clicking Lists and then clicking Add Contacts on the right. The new Add Contacts procedure gives you the option to Upload a CSV file, add one at a time with the Individual form, or Paste in up to 500 email addresses. The Paste In Multiple Emails option is a new feature that allows you to quickly add contacts to your list without setting up a spreadsheet file for import.
Creating New Campaigns
 We’ve changed the way campaigns are created. We have added a few steps to the procedure to help you make sure the campaigns you are sending are coming from the correct Sender address and with the correct Subject line. This will affect previously saved campaigns in that you will not be able to send test campaigns until you have edited the campaign to set the sender.
New Templates
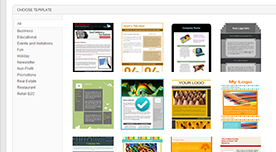 We’ve added many great new templates and designed a new way to select them. You can now see thumbnails of every template easily. Select a template, click Next and you can start a campaign with it. We will continually add more templates, so if you have a great idea for a new one, please tell us about it.
Managing Senders & Footers
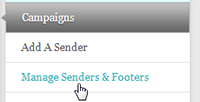 For those of you that take advantage of our Multiple Senders feature to send for different company locations or even for multiple clients of your own, we’ve made life a little easier. The New Manage Senders & Footers allows you to set a different mailing address for each email sender. This way when you send from a different sender, the footer of your email will include the address associated with that sender.
Reports
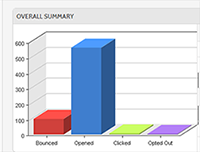 The Reports section is now bigger and easier to read. Do you ever confuse one campaign with another? We’ve now added a link so that you can quickly see a preview of the campaign just as it looked when you sent. Detailed reports now include the Sender address you sent the campaign from so that you can see what impact that had on the results of your campaign.
My Account
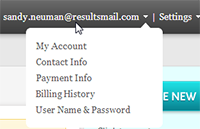 Need to change your username and password or contact and payment details? The top right corner of the screen displays your username. Click on it to select the information you would like to update. To the right you will find the settings. Here you may access the Senders & Footers as well as the code for setting up your website subscriber form for growing your list.
Ask Us A Question
 Do all of these changes have you a little confused? We’ve added a simple form to every page where you can Ask Us A Question. Just type your question in that little box on the right and it will send us your question with your account information so that we can provide you an answer as soon as possible. Answers will be sent to the Contact email address you have set in the My Account section.